Top 10 Foods For Great Hair

healthy hair, you are what you eat, best foods for hair

Want beautiful, healthy hair? Eat more blueberries! (Image courtesy of Paul and FreeDigitalPhotos.net.)

While researching hair care products, I came across an article on best foods to eat for great hair.

I know certain foods, like avocados and beer, are great to use on your hair. I just never thought about eating foods for hair care.

As a fish-hater, I wasn’t happy that salmon made the list (strangely enough I enjoy oysters). However, avocados, pumpkin seeds and walnuts are good substitutes. Plus, I take daily omega 3 fish oil supplements.

How many of these foods make it into your daily diet?

  1. Salmon
  2. Walnuts
  3. Oysters
  4. Sweet Potatoes
  5. Eggs
  6. Spinach
  7. Lentils
  8. Greek Yogurt
  9. Poultry
  10. Blueberries

Everyday Beauty – Gray Hair And Mastering That Damn Curling Iron!

everyday beauty, weight loss hair makeover, curling iron

For weeks I’ve been curling iron challenged. Thanks to Jenny, my hair stylist, I’m closer to mastering the perfect curl.

It’s been six weeks since my weight loss hair makeover and right on cue my gray hairs started sprouting. Now I’m notorious for letting the gray take over before breaking down and buying a box of color. Not anymore.

It was time to head back to the salon to visit my new favorite stylist Jenny.

Besides touching up my roots, I wanted Jenny to do another tutorial on the curling iron for me. I’ve tried to use it, but I always end up with a clamp dent near the ends. I got so frustrated that I started using my hot rollers again.

Burning Washing That Gray Out
My highlights and my ends still look awesome so no need for foil or a haircut this time out. Just a root touch up today.

Normally when I dye my hair I don’t wash it the day before. I want some oil build up to protect my scalp from the inevitable burning sensation. Well after yesterday’s workout and run, my hair was too funky not to wash.

So I braced myself. But as Jenny applied the dye, nothing happened. In fact, if felt quite cool.

I don’t know what hair dye product the salon uses, but it’s awesome! My scalp didn’t feel like it was on fire.

That’s it! No more box dye for me!

Prepping My Hair
After my shampoo, it was time to start styling. Jenny applied a heat protectant followed by a stronghold mousse to my wet hair. One to protect my hair from the heat of the iron and the other to define the curls and fight frizz.

And of course, I don’t have either in my home. Guess I’m going shopping this weekend.

Curling Iron Tutorial
dot curlWith my hair dried, Jenny handed me the curling iron and asked me to show her my mad skills!

I picked up a 2 inch section of hair, ran it through the curling iron first. I then clamped it about an inch from the end and rolled up until my hair was completely around the barrel. I released the clamp after about 10 seconds and…a near perfect curl.

Crap. It’s like taking your car in for repairs and you can’t reproduce the problem for the mechanic.

Hmmmm…me thinks the hair prep is a reason for great curls.

However, Jenny did notice a few problems with my technique.

I tend to hold the curling iron at an angle. Instead I need to keep it vertical (parallel to my face) with the clamp facing forward. Also I turned the iron in towards my face. Oops! I need to curl away from my face.

Jenny also recommends spraying my hair with a light-hold hairspray before using the iron. It’ll help hold the curls while doing my hair (I have a lot of hair!).

I carefully watched as she curled rest of my hair. When she got to the last piece to curl, she handed the iron over for me to do the honors.

I did everything right, including curling away from my face.

Whew!

Time to send those hot rollers packing.


Everyday Beauty — The Home Manicure Edition

everyday beauty home manicure

Looking pretty ugly, my nails needed some TLC!

My weight loss makeover continues with a home manicure. If I want to jazz up the leaner me, I can’t stop with new hair, makeup and outfits. My hands also need some TLC!

So last night I watched videos on doing your own manicure.

Yes, I’m 45 years old and never knew how to give myself a manicure. I thought I did. I just filed my nails and applied a coat of color. Boy was I wrong.

Confession: I really didn’t have to know how to do it. Why bother when I can go out to a nail shop and pay someone $20? Well $20 every two weeks adds up over time.  Plus, if I’m looking for ways to reward myself for weight loss success, a professional manicure isn’t that special if I do it all the time.

So I’ve decided to do my own nails and save the trip to the salon as a reward.

This morning I headed over to Ulta and picked up:

  • Nail polish remover
  • Crystal nail file
  • Nail buffer
  • Cuticle clippers
  • Cuticle stick
  • Cuticle balm
  • Hand lotion
  • Basecoat
  • Topcoat

I pretty much followed the tutorial video below.

I did deviate slightly. The tutorial recommends a liquid cuticle remover. I didn’t want to burn my cuticles off with a chemical.

A wonderfully helpful Ulta lady recommended soaking my hands in a bowl of warm water for about 5 minutes and applying a cuticle balm to soften my cuticles.   Then I used the cuticle stick to push the cuticles back and scrap up dead skin (like the video).

weight loss makeover home manicures

My first home manicure done right. Not too shabby. I’m sure I’ll get better with practice.

To remove the dead skin, I used cuticle clippers like the ones your local nail salon uses. I don’t cut the cuticles – I just remove the dead skin – because you can easily get an infection.

Overall I’m happy with this attempt. The whole process was quick and painless. Since I need to do my nails once a week, I should get better at it.

Now I just need to stop biting my nails so they can grow!


Everyday Beauty: Picking The Right Lip Color

picking right lipstick color, everyday beauty makeover, chosing right lip color

With so many colors to choose from, how do you pick the color that’s right for you? Image courtesy of Salvatore Vuono and FreeDigitialPhotos.net.

After nearly two weeks since my makeup makeover, I finally went shopping for some lipstick. I headed out to my local drug store and quickly got overwhelmed. So many choices. They all look so pretty. But how to tell if the one I pick is the right color for me?

And it’s not like Walgreens will let me try them on.

I immediately avoided the reds. I’ve never found a red lipstick that looked good on me.

But then I thought, I look great wearing my red shirts and sweaters. So what gives?

Then it dawned on me. When I went shopping with my Glam Squad we selected makeup based on my skin tone and eye color. Hmmmm… it makes sense that my skin and lip colors are key to selecting the right lipstick.

I left the store empty-handed, but more determined.

When I got home I asked The Google to clarify this mystery.  Bobbi Brown’s Lip System had the answer for me.

It turns out picking the right color isn’t all that hard.

Using the natural color of my lips as my guide, I can find my matching lip color. From there, staying in that color family, I can easily find flattering neutral, bright and deep lipstick shades. And I can play with different textures.

Seems like a simple way to start building my lipstick collection.  Of course it only took me 30 years to figure it out.

Tomorrow I head out to Macy’s cosmetics department, much more confident of success.


Cover Girl Time: The Weight Loss Makeup Makeover

weight loss beauty makeover, weight loss cosmetics, reward weight loss with makeup

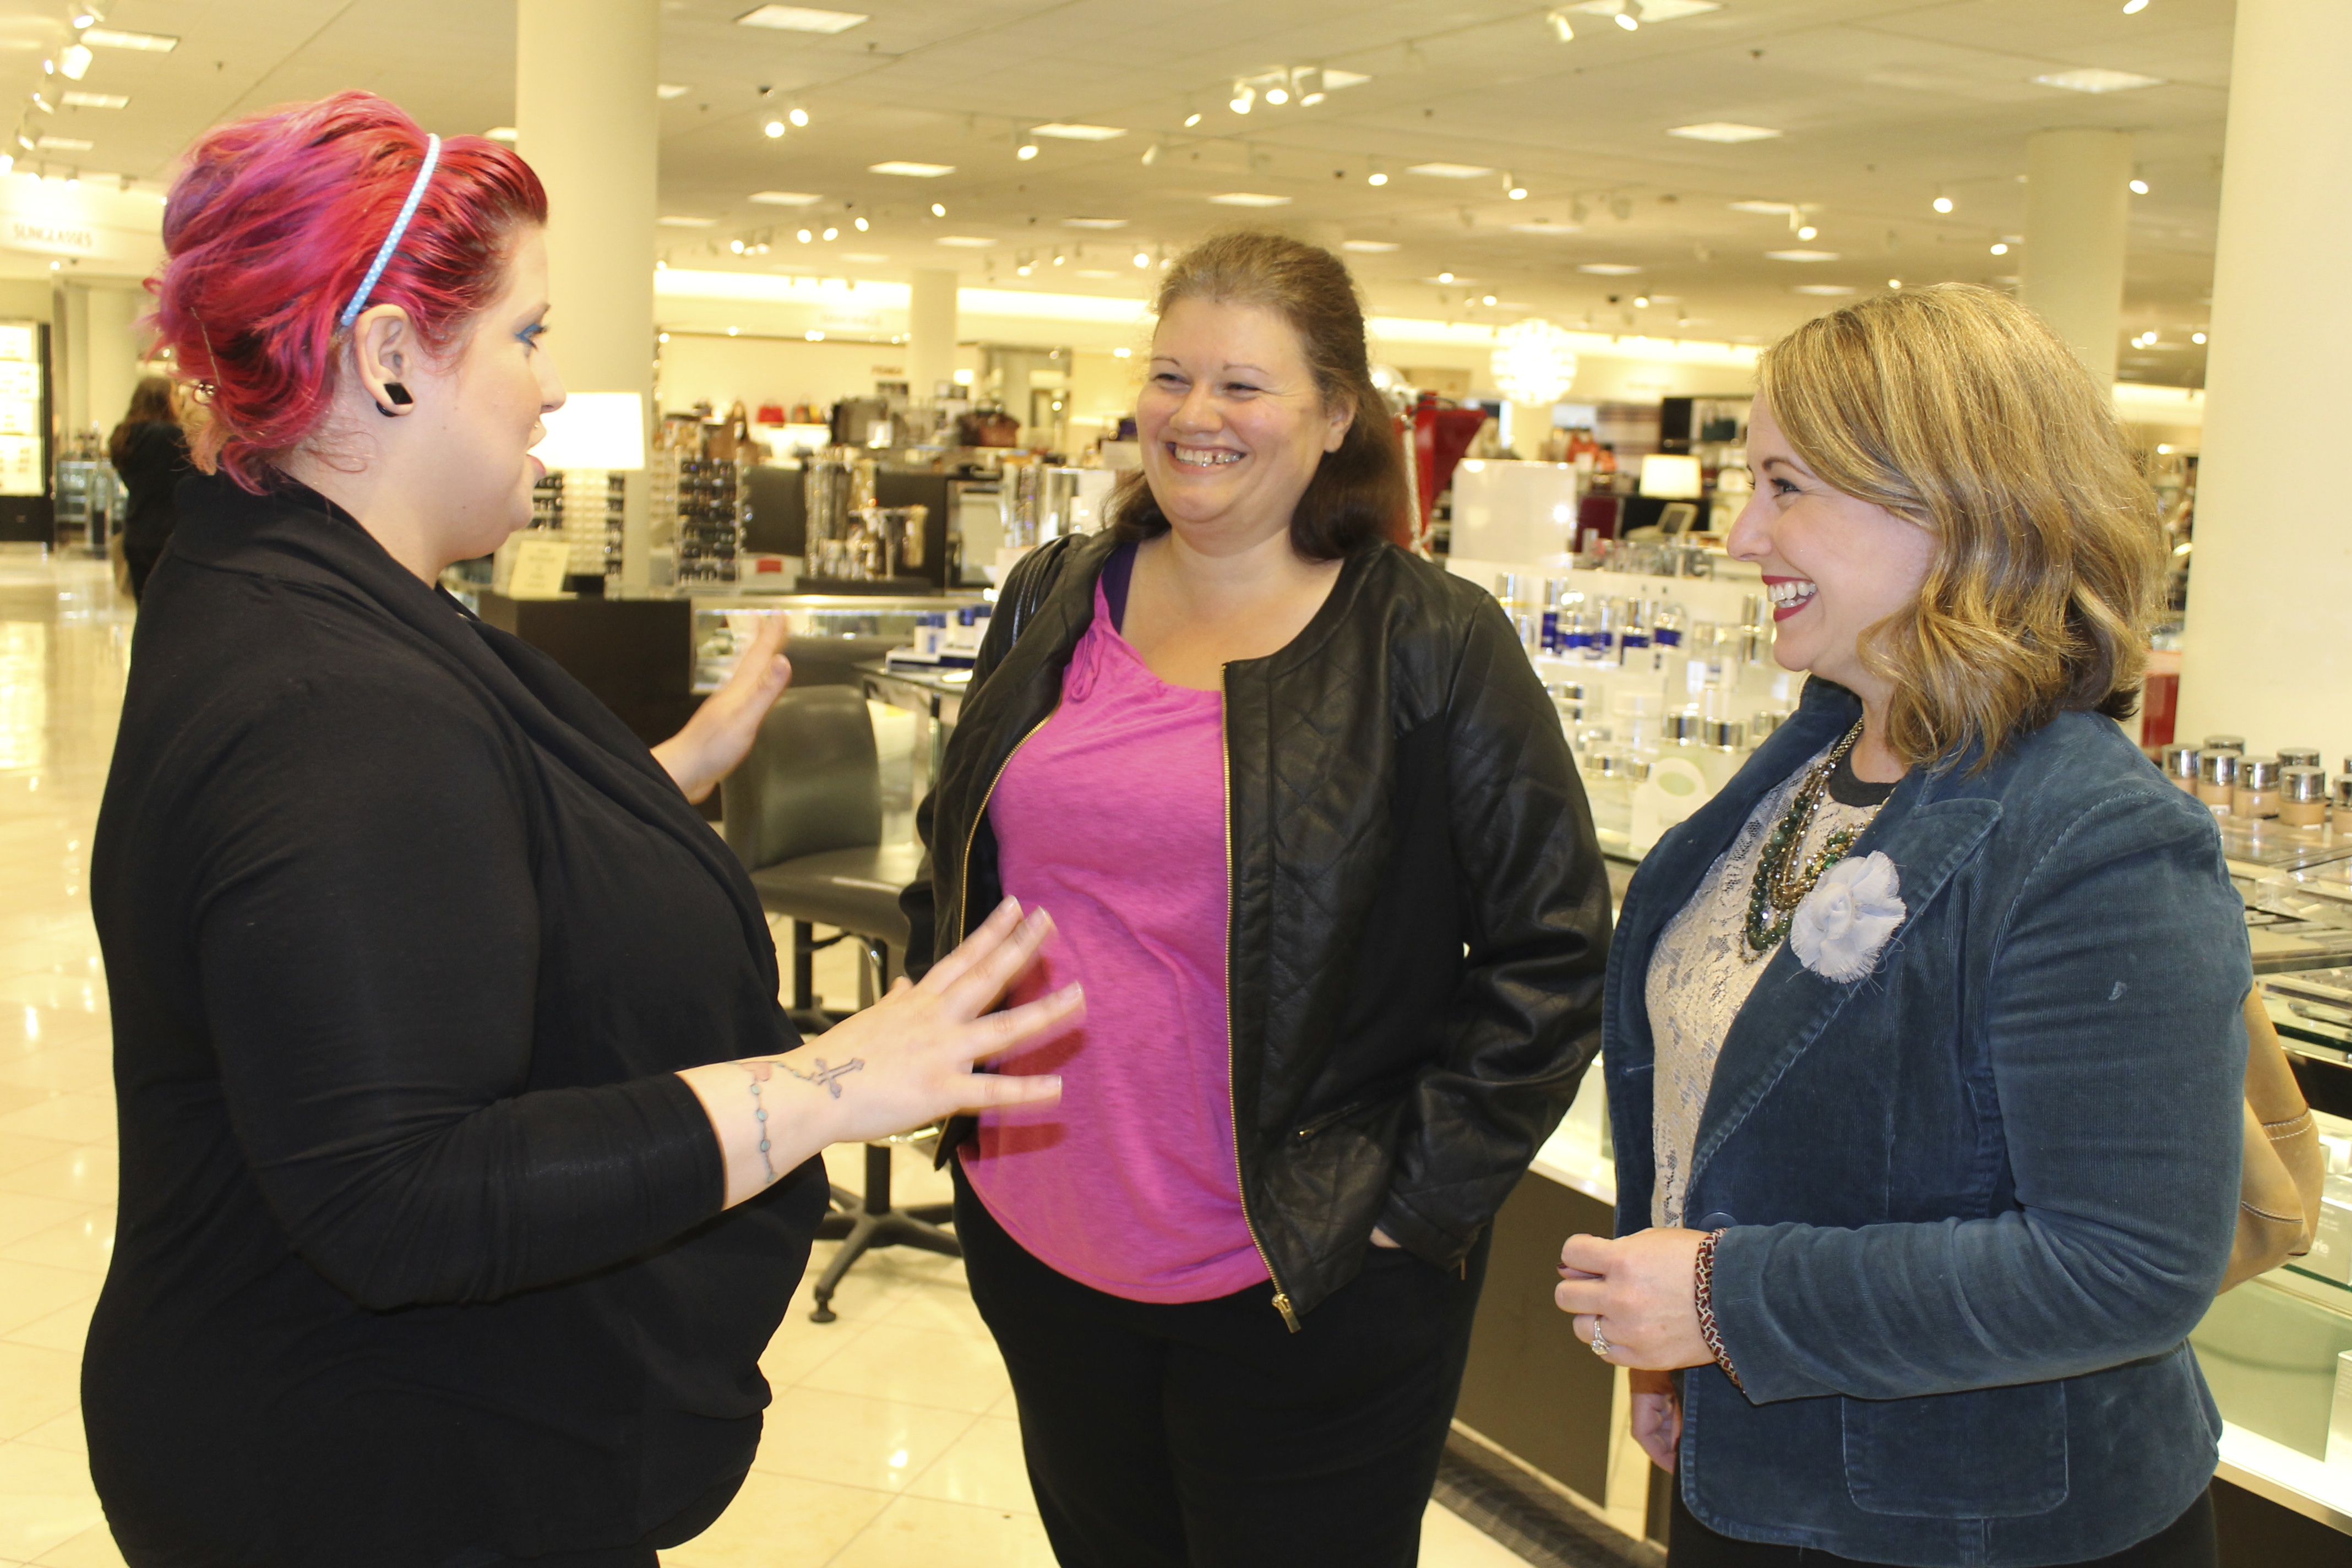
(L-R) Nordstrom’s beauty stylist, me and Julie talking about best products for my skin.

Since I was rewarding myself for losing weight with a wardrobe and hair makeover, it made sense to ask my Glam Squad – Julie and Claire, the makeover pros – for some makeup advice too.

Confession Time
I never really wear that much makeup.  I don’t prefer going barefaced, but I never felt confident on how to put it on.

But before I could attend Julie’s makeup master class, I needed to actually buy makeup.

Skimping and Splurging
I don’t know about you, but I always find the department store makeup counters overwhelming. If I don’t know what I need, how do I shop for it? And which products are the best?

The good news: Julie went with me to take some of the mystery out of the experience.

Julie knew exactly what I needed. Her big challenge – staying within my $225 budget! Now that may seem like a lot, but keep in mind we were starting from scratch. I needed to invest in certain specialty items. Other things I could pick up on the cheap at my local drug store.

Our list included the basics:

  • Face – coverage makeup
  • Eyes – eyeliner, eye shadow, eyebrow liner and mascara
  • Cheeks – blush, bronzer
  • Lips – lipstick, gloss, liner

And if the budget supported it, an eye cream and Estee Lauder’s Advanced Night Repair (I’ve used this and it rocks!).

weight loss beauty makeover, reward weight loss with makeup

Glam Squad’s Makeup Master Class: Learning how to apply concealer to get rid of those dark circles under my eyes.

When I arrived at Nordstrom’s makeup counter, Julie was already working with the beauty stylists pulling different products for me to test.

Julie recommended we splurge on a tinted moisturizer (Laura Mercier) for my dry skin and to help tone down my naturally very rosy cheeks. Also I needed to invest in a good concealer (Estee Lauder) for those dark circles under my eyes.

We both loved the Laura Mercier Colour Wardrobe. It had everything I needed for my eyes and cheeks. The colors perfectly complimented my skin color and green eyes.

We also picked up brushes at Sephora.

As for my lips,  the Bobbi Brown Lip Gloss Trio tempted us. Unfortunately, we just couldn’t make the budget work.

It was an educational shopping trip, completely took the fear away of visiting the makeup counter, and best of all Julie stayed within $2.00 of my budget – how’s that for awesome!

weight loss beauty makeover, rewarding weight loss with makeup, everyday beauty

The master at work! Julie touching up the eye makeup as we take a brief pause during the photo shoot.

Makeup Master Class
Sunday morning I met up with my Glam Squad for a makeup master class.

Julie walked me through step by step – how much tinted moisturizer to put on (a nickel-size drop); best way to apply the concealer (pat it on with the ring finger!); simple motion for applying blush (backwards “C”); and lots of little tricks for my eyes and lips.

She went over what each brush is for and how to care for them (wash once a week in baby shampoo).

She was incredibly patient with my questions. And she had great little tips for turning mistakes into great looks.

The best thing about makeup class: Julie crafted me a look that was amazing, quick to put on (90 seconds folks!) and felt like I’m not wearing makeup.

Now I just need to practice, practice, practice.

So ended the morning portion of Day 3 of my weight loss makeover. Up next, putting it all together for the photo shoot!

Related Articles/Links


Waging War On Dry Skin

I’ve added a skin care routine as part of my Everyday Beauty efforts.

Since I hit 40, I’ve battled dry, itchy and flaky skin.

My biggest problem – not drinking enough water. When I finally got serious about weight loss, my water intake shot up. I’m drinking in about 2+ liters of water a day, keeping my skin hydrated.  Before the diet, you could find cracks on my feet, just like the ground during a drought.  Not pretty.

Thanks to that high quality H20 my skin isn’t that bad anymore. However smooth skin requires a balance between water and body oils.

Battle Plan For Silky, Smooth Skin
My skin battle is half way won thanks to my diet. To win the war, I have the following plan:

  • Apply a moisturizer 3 times a day (including immediately after a shower).
  • Ciao harsh soaps. They strip lipids and water from your skin. Now I’m only using soaps that moisturize.
  • Good-bye to steamy showers. Long, hot showers dry out the natural oils in your skin. So I’m dialing down the temp to lukewarm and keeping the shower to under 10 minutes.
  • Hello sunscreen. I’m Vitamin D deficient, so during my walks I forgo using any sunscreen. I just learned that while sun exposure dries skin, the big damage occurs in the dermis where collagen and elastin fibers break down rapidly, leading to deep wrinkles and sagging skin. My strategy now is to spend 15 minutes outside without any sunscreen to load up on Vitamin D. Then apply a sunscreen with moisturizer for the walks.

For my plan to come together, I needed a few items from Target to help keep my skin feeling smooth and silky.

  • Cetaphil Cream ($8.59 – on sale)
  • CeraVe Hydrating Cleanser ($11.99)
  • CeraVe Facial Moisturizing Lotion ($12.99)
  • Aveeno Skin Relief Body Wash ($7.49)
  • Yardley Oatmeal & Almond Moisturizing Soap ($1.99 – 2 bars)

Cetaphil is my new workhorse – applied 3 times a day, including right after a shower.  I’ll use the CeraVe products only on my face in the AM/PM.  Aveeno and Yardley are for showers.

As you can see, Everyday Beauty can be expensive. So depending on how well the above products work, I am considering making my own moisturizers and facial masks with natural ingredients. Ah, the power of the Web!


50 Shades of Gray…Hair

The Skunk Streak is back!  Time to wash it right out of my hair!

The Skunk Streak is back! Time to wash it right out of my hair!

I’m using the day to pamper myself a bit. This morning shopping. In a few minutes, dying my hair.

I’m horrible at touching up my roots every 6-8 weeks. I usually let it go for 12 weeks and the result is the same – a skunk streak right on top. I don’t know why, but this is the only spot on my head that gets gray hair. Normally I can hide it by switching which side my part is on. But by the 8 week mark, no hair style can hide the silver streak.

I knew it was time to dye my hair when this morning a cashier at Target asked me what salon I go to for that “awesome white spot.” I told her my salon’s called Mid 40s.

I’ve seen a few articles about celebrities adding gray highlights, claiming gray is the new black (easy to say when you are in your 20s). That’s the reason my cashier was so impressed with my hair color. It’s the in thing.

Wow, a sign of my aging is now a fad.

For me, Everyday Beauty means not following fads!

So I promptly went across the street and picked up three boxes of ColorSilk. My hair is dark brown. I decided to try Light Golden Brown.  I’m not expecting my hair to be anything but dark brown. However, it might turn the gray into really nice highlights.

At some point I think I’ll try going lighter. Not blonde. A real light brown. But I’ll go to a salon when I get up the nerve.

Lately I’ve taken to air drying my hair. My hair is medium length and is very thick – hence the 3 boxes of dye. Letting it dry naturally brings out my natural wave and curls. And right now, I like that. Otherwise, it takes about 90 minutes to dry and style this big ol’ mess of hair I have on top my head.

Simplicity. Works for me.


Get Your Mask On!

Do you mask? Everyday beauty includes a skin regimen.

Do you mask? Everyday beauty includes a skin regimen.

Mud masks are magical!

I stopped using mud masks a few years ago and I have no idea why. Not only does a mask help clean your skin but it’s relaxing and fun. Trying not to smile once it dries is difficult, which is why I stay away from mirrors.

Masking Tips

  • Exfoliate Before – For the mask to penetrate and draw out the impurities in your pores, it works best if you remove the dead layer of cells on your face.
  • Moisturize After – Masks pull oil away from the skin, which is why if you’re like me and have dry skin you should 1. Apply a moisturizer after you wash the mask off, and 2. Limit masks to twice a week.

I did a little research this weekend and sure enough, mud masks are formulated for your skin type. The mud in my cabinet is probably 4 years old. No doubt, it’s not the best for my face. Oh well. I guess it’s another item to go on my make-over list (oh, the make-over is in September).

Everyday beauty means looking after my skin…and setting aside two nights a week to play in the mud is just the ticket.


Everyday Beauty

Ah! Warm golden brown hair courtesy of Garnier; seductive pink lipstick by Loreal; and Khaki Blue eyeshadow provided by Estee Lauder.

Warm golden brown hair courtesy of Garnier; seductive pink lipstick by Loreal; Khaki Blue eyeshadow provided by Estee Lauder; and necklace supplied by Lane Bryant.

Yesterday I decided to do some low-budget pampering.  I’ve lost weight, but other than buying new clothes (required!) I really haven’t focused on my appearance. I’d just put my hair up in a pony tail and head out the door. I’m still on my sabbatical from work so I don’t feel the need to dress up just because I’m leaving the house. And if I’m being honest, I really did the bare minimum for work.

Well now it seems that I’m having a change of heart. I feel great about myself and all the work I’ve done the last year.  But I’m starting to get a little miffed at myself for being too low maintenance when it comes to how I look.

I think I never really bothered with it before because I worried about how an outfit looked on my frame. Did it fit was more important than does it flatter my figure. Perhaps I’m now feeling great about myself and I just want it to project it on the outside.

I started with a quick little inventory.

  • Shoes – 2 pairs of flip-flops and a pair of Nikes.  How sad.
  • Make-up: 3 lipsticks, blue eye shadow, no blush.
  • Hair: A ton of gray that needed to go.
  • Nails: All of my acrylic nails had popped off except for my right thumb nail. Wow, stay classy Dot!
  • Skin: Dry as hell.
  • Jewelry: Have a ton…so why not wear some?
  • Purses: 1

So yesterday I took care of those nasty grey hairs, gave myself a damn fine manicure, lotioned up, and made do with the little make up I own.

My new philosophy: Make everyday a day of beauty!