Choosing A Red Lipstick — Not As Easy As You Think

Feeling a little sassy playing with my new red lipstick.

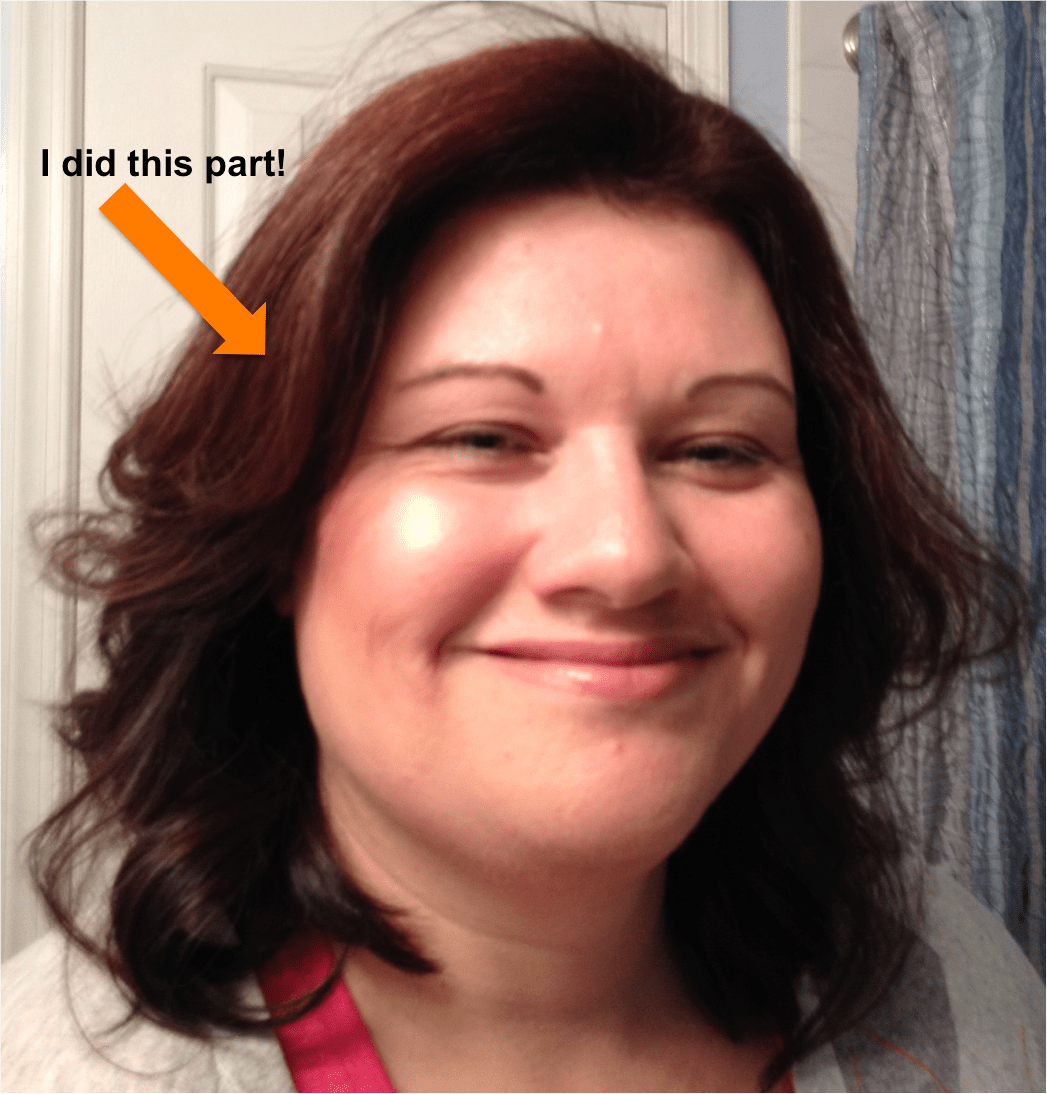
It’s late and I’m feeling tired, yet sassy as I play with my new red lipstick.

Can someone tell me why picking out a red lipstick is so frickin’ hard? I spent what seemed like an eternity at Sephora analyzing every single red lipstick in the store.

Before walking into the store, I did my homework. I’ve read tons of articles about orange-reds, blue-reds and true reds. And all the writers can’t seem to agree on a magic formula.

After spending nearly an hour checking out all of reds, I decided to throw myself at the mercy of the Sephora chicks to pick a color for me.

So began my odyssey of trying on one color after another. Focusing on the Sephora Collection, first up was Deep Brick Red, my first experience with a “blue-red” color. I absolutely loved the color, but it was so intense. Very much a Snow White look. But up against my pale skin, my lips were all that you saw.

Sigh…

Next my Sephora chick picked out a beautiful pink that I promptly shot down. I was there to conquer my fear of red lips. No pink today!

We then looked at two lovely colors that looked pretty – Classic Bright Red and Valentine. But yet again I felt washed out. The bright red was, well BRIGHT! But I absolutely loved the color, just not the pasty white skin on my face.

The Valentine? It didn’t just pop against my skin color, it supernovaed on me.

I ended up leaving the store empty-handed and dejected.

I decided to start from the beginning, refining my search for some solid advice.

Enter Makeup Geek.

Finally someone who knows how hard it is picking the right red.

Makeup Geek’s post on red lipstick struck a chord with me. She suggest it’s more about how bright the color is against your skin and not the lipstick color. But you also need to consider your eye and hair color as well as your eye makeup too.

When I walked into Sephora, I wasn’t wearing makeup. So any red lipstick would make me pasty white.

So I put on my makeup, choosing Laura Mercier’s Crystal Beige and Morning Dew eye shadow and headed back to Sephora.

Wow what a difference. Both the Classic Bright Red and Deep Brick Red looked amazing. The Valentine…no so much. The colors popped but didn’t overwhelm my face. But I only had enough cash for one. I chose the Classic Bright Red. I always go with darker colors, so I decided to pull a George Costanza and go the opposite of my instinct!

Makeup Geek recommends 5 possible reds that most people can pull off. I plan to check those out soon.

But I know in a couple of weeks, I’m going back for the Brick Red.


Don’t Fear The Powder Eyeliner

My first attempt at powder eyeliner. It was fairly easy applying it to my upper eyelid. My lower lid is another story.

My first attempt at powder eyeliner. It was fairly easy applying it to my upper eyelid. My lower lid is another story.

After finally getting the hang of pencil eyeliner last week, I decided it was time to give powder a try. Armed with the Laura Mercier Color Wardrobe, an angled brush I picked up at Sephora, and a few of Q-Tips, I was ready to do battle.

Actually, it was more tussle than battle.

On my first attempt, I pretty much nailed my upper eyelids perfectly.  I simply wet my brush, dipped it in the powder and pressed the brush into my eyelashes. Pretty simple and sadly, anti-climactic.

After last week’s challenge with using the pencil liner, I was expecting more of a challenge.

Why was I so afraid? This was easy.

I only messed up the outside corner of my upper eyelid. There is a reason you use an  angled brush! But I was able to fix it right up with a trusty Q-tip.

Then it was time to do the lower lid.

It looks OK in the photo above, but in person it was a hot mess.

First I applied way too much pressure. The brush’s bristles felt like pins. My eye started tearing, causing the powder I applied to run.

Drunken raccoon, here I come.

Did a few tears and eye pain stop me?  Nope. I continued across my eye. But my hand became more jumpy out of fear of pressing too hard again. The result was a very jagged line under my eye.  No amount of smudging could salvage what I did.

Feeling a bid defeated, I sucked it up, wiped away the eyeliner and went back for round two. Starting with my lower lid, I relaxed my hand and gently pressed on my eyelash line.

No pain.

My second try at applying powdered eyeliner. Once I relaxed my hand and stopped pressing the blasted brush into my eye, things got much easier!

My second try at applying powdered eyeliner. Once I relaxed my hand and stopped pressing the blasted brush into my eye, things got much easier!

I followed my lash line, applying the powder to only the outer 1/3 of the lashes.  Gone were the jagged lines and the drunken raccoon. Just a few strokes with the Q-tip and I was staring at one smooth line. Sweet!

Do I still think eyeliner is the devil?  No.

I’m a little excited about playing with different colors and trying more dramatic looks down the road. For now, I’m just happy I didn’t poke my eye out.


Eyeliner Is The Devil!

eyeliner

The carnage! Why is eyeliner so damn hard to put on?

Like foosball, eyeliner is the devil! I’m convinced of it. It seems like no matter what I do I ended up looking like a drunk raccoon.

Despite my make-up makeover, eyeliner stumps me.

Applying it to my lower eyelid is easy. It’s that damn upper lid. Following my eye line is impossible. I always end up with a very uneven line and no amount of smudging will help.

Well this week it’s practice, practice, practice!

I worked on my eyes for an hour yesterday, trying to master my eyeliner pencils.  Tomorrow I’m working on applying the powders.

What happens when my hands are not steady. One side is much lighter than the other.

What happens when my hands are not steady. One side is much lighter than the other.

Technique challenges
After the first 20 minutes, I realized two problems.

First, I’m trying to apply it while standing.  Hummmm…I think I need to sit down and place my elbow on the countertop. That should help steady the hand doing the deed.

My second problem, is more mental. I’m very squeamish when it comes to anything near my eyes. Heck, I can’t even wear contacts because it gives me the willies. As soon as I get the pencil close to my eye, I start the rapid blinking. I realized I had a problem when I flinched…that left a lovely line that no Q-tip could fix.

Always have the right tools!
Sitting at my desk with a new strategy in hand, I began working on my upper eyelid. Right away I notice that some eyeliner pencils go on easier than others, making a steady hand even more important.

Also, I need to invest in a sharpener. You really lose control with a dull pencil.

I started to get the hang of eyeliner about 30 minutes into my practice session.

I started to get the hang of eyeliner about an hour into my practice session.

The results?
I tried my black, blue and brown pencils. I got the best results with the brown followed closely by the blue. No matter what I did, it seemed as if the black always went on in globs. That tells me it might be the pencil and not me.

I focused on short strokes along my eyelash line while holding down my eyelid. Starting on the outside of my eye, I worked my way in towards my nose. I’m not sure if I should go all the way over or stop at mid-point.  Also, is it best for the eyeliner to go on first or last? Since I’m holding my eyelid down, shouldn’t eyeliner go on first to avoid smudging the eyeshadow?

So many questions…I’m going to need to put out an SOS to my Glam Squad.

A couple of times I went too fast and started drawing long lines with awful results.

After an hour I felt I got the hang of it. Most mistakes were tiny and something I could easily correct with a Q-tip.

Tomorrow I need to drop by Sephora for a sharpener, a good black eyeliner pencil (maybe green too!) and a slanted brush to practice with the powder.

I will master this witchcraft.

Related Articles
You can follow my weight loss make-over here:


Top 10 Foods For Great Hair

healthy hair, you are what you eat, best foods for hair

Want beautiful, healthy hair? Eat more blueberries! (Image courtesy of Paul and FreeDigitalPhotos.net.)

While researching hair care products, I came across an article on best foods to eat for great hair.

I know certain foods, like avocados and beer, are great to use on your hair. I just never thought about eating foods for hair care.

As a fish-hater, I wasn’t happy that salmon made the list (strangely enough I enjoy oysters). However, avocados, pumpkin seeds and walnuts are good substitutes. Plus, I take daily omega 3 fish oil supplements.

How many of these foods make it into your daily diet?

  1. Salmon
  2. Walnuts
  3. Oysters
  4. Sweet Potatoes
  5. Eggs
  6. Spinach
  7. Lentils
  8. Greek Yogurt
  9. Poultry
  10. Blueberries

Everyday Beauty – Gray Hair And Mastering That Damn Curling Iron!

everyday beauty, weight loss hair makeover, curling iron

For weeks I’ve been curling iron challenged. Thanks to Jenny, my hair stylist, I’m closer to mastering the perfect curl.

It’s been six weeks since my weight loss hair makeover and right on cue my gray hairs started sprouting. Now I’m notorious for letting the gray take over before breaking down and buying a box of color. Not anymore.

It was time to head back to the salon to visit my new favorite stylist Jenny.

Besides touching up my roots, I wanted Jenny to do another tutorial on the curling iron for me. I’ve tried to use it, but I always end up with a clamp dent near the ends. I got so frustrated that I started using my hot rollers again.

Burning Washing That Gray Out
My highlights and my ends still look awesome so no need for foil or a haircut this time out. Just a root touch up today.

Normally when I dye my hair I don’t wash it the day before. I want some oil build up to protect my scalp from the inevitable burning sensation. Well after yesterday’s workout and run, my hair was too funky not to wash.

So I braced myself. But as Jenny applied the dye, nothing happened. In fact, if felt quite cool.

I don’t know what hair dye product the salon uses, but it’s awesome! My scalp didn’t feel like it was on fire.

That’s it! No more box dye for me!

Prepping My Hair
After my shampoo, it was time to start styling. Jenny applied a heat protectant followed by a stronghold mousse to my wet hair. One to protect my hair from the heat of the iron and the other to define the curls and fight frizz.

And of course, I don’t have either in my home. Guess I’m going shopping this weekend.

Curling Iron Tutorial
dot curlWith my hair dried, Jenny handed me the curling iron and asked me to show her my mad skills!

I picked up a 2 inch section of hair, ran it through the curling iron first. I then clamped it about an inch from the end and rolled up until my hair was completely around the barrel. I released the clamp after about 10 seconds and…a near perfect curl.

Crap. It’s like taking your car in for repairs and you can’t reproduce the problem for the mechanic.

Hmmmm…me thinks the hair prep is a reason for great curls.

However, Jenny did notice a few problems with my technique.

I tend to hold the curling iron at an angle. Instead I need to keep it vertical (parallel to my face) with the clamp facing forward. Also I turned the iron in towards my face. Oops! I need to curl away from my face.

Jenny also recommends spraying my hair with a light-hold hairspray before using the iron. It’ll help hold the curls while doing my hair (I have a lot of hair!).

I carefully watched as she curled rest of my hair. When she got to the last piece to curl, she handed the iron over for me to do the honors.

I did everything right, including curling away from my face.

Whew!

Time to send those hot rollers packing.


Kangoo Jumps – OK, I’m Curious

physical exercise, weight loss and kangoo jumps

Kangoo Jumps — Will these make my Christmas list?

I started putting together my list for Santa this weekend when I came across Kangoo Jumps. They look absolutely ridiculous…and amazingly fun.

I’ve read that the shoes reduce the impact on joints by up to 80%. That got my attention.

Apparently Kangoos have been around since the ’90s. I’m not sure how popular they are, but I’m seeing them more on fitness sites. I’ve never heard of them until this weekend.

To me Kangoos look like ski boots with shock absorbers on the bottom. I’m not sure about the comfort level when jogging. Seems like it lacks flexibility that my regular old Nike’s offer.

In the little research I’ve done, running in Kangoo Jumps is like to running on a trampoline. Apparently you burn up to 50% more calories and cardio in regular sneakers. Since you rebound off the ground, you use your core more to stabilize yourself.

I haven’t run across these in the DC area yet, but I’d love to try them out.

Has anyone in the Peanut Gallery tried Kangoo Jumps?


Working Out In The Dressing Room

Trying on a new workout outfit.

Trying on a new workout outfit. Notice the wind-swept ‘do and wonderfully applied makeup!

While shopping for some new workout wear, I made a point of doing a mini exercise routine in the dressing room.  I needed to see how the clothes moved with my body. If I couldn’t see my upper body, abs or quads move, then the gear’s too loose.

I tested clothes in my current size (18/20) and a size smaller (14/16). I did a couple of squats, bicep curls and mountain climbers, keeping a watchful eye out for anything bunching or revealing.

Two styles of shirts passed the test and three failed.  The Capri leggings fit perfectly.  The best thing about the test: The smaller sized clothes won out!

I ended up buying my new gear at Lane Bryant. I liked what I saw at Old Navy, but my new favorite store just couldn’t beat Lane Bryant’s 40% off everything sale. Cha-ching!!

Also Lane Bryant just rolled out its new TruDry line where the fabric pulls moisture away from your skin. Perfect for sweaty workouts!

I ended up with a couple of Capri leggings, tank tops and tees — all 40% off!


On The Hunt For Fashionable And Functional Workout Wear

I'm on the hunt for new workout clothes. This Panache sports bra is on my list!

I’m on the hunt for new workout clothes. This Panache sports bra is on my list!

While doing mountain climbers, my top flipped up so my back and stomach were showing. I pushed through the routine before pulling my shirt back into place.  My once form-fitting top is now too baggie for the gym.

Plus during the kettlebell goblet squats, noticed a few tears in my pants near my thigh.

Clearly it’s time to replace some items in my workout wardrobe.

What Am I Looking For?
Great Material — While I love my cotton tanks, I need to find fabrics that wick moisture away from my skin. Something like CoolMax or Dri-FIT.

Avoid Flashing — I’m looking for form-fitting clothes so they don’t get in the way of the workout. The last time I picked up workout threads, the sales clerk recommended I buy one size smaller.  That seemed to work.

A Kick A$$ Sports Bra – This is my Great White! I don’t know if such a thing exists in the wild. There are exercises I avoid (jumping rope!) because I have yet to find a bra that can handle diverse workouts. I’ve started double bra-ing it for my 5K training because nothing I own gives me the support I need.  I’ve read good things about Panache and Enell sports bras. Users seem to swear by them. I plan to try both out.

Note to bra makers: Yes, we larger cup women want support when we workout. But we want to look fashionable too. Unfortunately, you make products that create the dreaded uni-boob look.  What are you thinking? I want a bra that gives me the support I need, but also hugs and shapes in the right places, isn’t too tight in the back, the straps don’t dig in and isn’t visible when I wear a v-neck top. Now get to work!

No Baggie Pants — I love wearing sweats to relax around the house, but I can’t work out in them. The cloth can get caught in the stationary bikes or elliptical machines. The same goes for any workout pants that flare out at the bottom. The other challenge is finding workout shorts and capri leggings. Most stores only have gear for winter.  Oh well…

There’s always Amazon!


Everyday Beauty — The Home Manicure Edition

everyday beauty home manicure

Looking pretty ugly, my nails needed some TLC!

My weight loss makeover continues with a home manicure. If I want to jazz up the leaner me, I can’t stop with new hair, makeup and outfits. My hands also need some TLC!

So last night I watched videos on doing your own manicure.

Yes, I’m 45 years old and never knew how to give myself a manicure. I thought I did. I just filed my nails and applied a coat of color. Boy was I wrong.

Confession: I really didn’t have to know how to do it. Why bother when I can go out to a nail shop and pay someone $20? Well $20 every two weeks adds up over time.  Plus, if I’m looking for ways to reward myself for weight loss success, a professional manicure isn’t that special if I do it all the time.

So I’ve decided to do my own nails and save the trip to the salon as a reward.

This morning I headed over to Ulta and picked up:

  • Nail polish remover
  • Crystal nail file
  • Nail buffer
  • Cuticle clippers
  • Cuticle stick
  • Cuticle balm
  • Hand lotion
  • Basecoat
  • Topcoat

I pretty much followed the tutorial video below.

I did deviate slightly. The tutorial recommends a liquid cuticle remover. I didn’t want to burn my cuticles off with a chemical.

A wonderfully helpful Ulta lady recommended soaking my hands in a bowl of warm water for about 5 minutes and applying a cuticle balm to soften my cuticles.   Then I used the cuticle stick to push the cuticles back and scrap up dead skin (like the video).

weight loss makeover home manicures

My first home manicure done right. Not too shabby. I’m sure I’ll get better with practice.

To remove the dead skin, I used cuticle clippers like the ones your local nail salon uses. I don’t cut the cuticles – I just remove the dead skin – because you can easily get an infection.

Overall I’m happy with this attempt. The whole process was quick and painless. Since I need to do my nails once a week, I should get better at it.

Now I just need to stop biting my nails so they can grow!