
Happy Valentine’s Day!

Since the start of my Paleo Challenge, my sugar cravings are back. The sugar monster inside of me raged the last two weeks.
I’ll find out tomorrow, but I think my weigh-in will show a gain. For the last couple weeks I’ve wrestled with sugar cravings. As a result, some unhealthy foods appeared on my plate this week (a little too much wine and those blasted pancakes). It’s time to get back to basics and stop feeding that sugar monster.
What isn’t helping is the lack of exercise. I had a great workout on Wednesday with my trainer, but I tripped over a locker room bench and twisted my injured knee. I’ve iced it, but this morning it’s swollen and stiff. So no spin or yoga classes today and no muscle workout tomorrow. I need to baby it for the next few days.
Frustrated? You bet. Exercise keeps me focused on the prize and my eating in check.
While my knee is still on the mend, I think it’s a good time to get back to basics with my food. That’s how I started this little journey 100 pounds ago. It’s time to refocus and get back to eating 20g-25g of carbs a day for the next couple of weeks.
I’m still doing the Paleo challenge, but I’m going to simplify. I’m skipping the Paleo recipes this coming week. Instead I’ll eat veggies and a simple protein with each meal. But I’m adding back in one very non-Paleo item. My protein shake.
My sugar cravings are still raging this week (hence the wine) and I think fruit is the trigger. Since starting Paleo, my fruit intake is way up and I’m craving the sweet stuff as a result.
I started cutting back on fruit last week, but all that did was release the kraken. On Wednesday morning I went cold turkey to get the sugar monster off my back once and for all. My cravings reached a fever pitch Thursday afternoon. This morning I feel fine, but banning fruit from my diet isn’t a solution.
Which gets me back to the protein shake. I always added ½ banana and ½ cup of a berry with my protein shake. The fruit improves the taste of the shake and feed my muscles after working out with weights. When I blend the fruit with the shake, I have zero sugar cravings.
So my shake will be my one break from Paleo. And to me, that’s OK.
I’m trying to lose weight, not conduct a science experiment.

This dish starts with layering sliced apples and blackberries. I used Granny Smith apples, the best baking apples.
With the recipe, “crumble” is the key word. This little Paleo dessert turned out tasty but very messy. The top layer of ground almonds, coconut shavings and walnuts completely fell apart when it was time to take it out of the bread pan.
If I make this again, I think I’ll use a pie pan for ease of getting the dessert out of the pan without a lot of mess.
Like many of the Paleo recipes I’m encountering, this one has a whole lotta carbs and Points thanks to the ground almonds, coconut flakes, butter and walnuts. I’d recommend for those on Weight Watchers to skip the crumble and bake the apples, blackberries, honey and cinnamon and splurge with a dollop of whipped heavy cream for a 2-point dessert.

Here’s what the crumble looks like before going into the oven.
Apple Blackberry Crumble
Net Carbs: 17g
Weight Watchers PointsPlus: 12
Servings: 6
Ingredients

Yes, it’s messy but tasty. I whipped the cream my self and added a sprinkle of cinnamon on top. The crumble is a little on the dry side, but the cream adds some needed moisture.
Directions
This recipe is from The Paleo Primer.

We’re busy digging out of Winter Storm Pax (1.5 feet and counting!). So while I’m shoveling show, here’s a little romantic Valentine’s Day short story by my hubby to entertain you until I can post the Paleo Apple-Blueberry Crumble recipe.
 After two successful years and 100+ pounds lost, why do I still beat myself up for slip-ups? I screw up and I immediately reboot into the old “all or nothing” mode. For some reason there’s a little part of me that still expects perfection when it comes to food choices. Well, Sunday, I severely disappointed that side of me.

A healthy version of a classic British comfort food, this Paleo Bangers & Mash recipe is super easy to make and delicious.
Bangers and Mash, the ultimate British comfort food, is perfect on cold winter days. The problem? It’s not very healthy. Well this weekend I tried a Paleo twist on this classic dish that is amazing and healthy. Just switch out the mashed potatoes for sweet potato mash and forget about the gravy (really, it’s not needed).
The recipe I based my knock off on is from The Paleo Primer. I modified the recipe to lower the carb count and cut the PointsPlus value.
The original recipe called for gluten-free sausages. I couldn’t find any so I substituted turkey sausages (no carbs). In addition, I reduced the number of sweet potatoes (1 instead of 2). The recipe also called for using 2 tbsp of ghee for the potatoes plus more for cooking the sausage. I only used 1 tbsp of ghee for the potatoes and didn’t cook the sausage in any oil.
The recipe below is my modified version.
I included a side of sautéed spinach with toasted pine nuts and oven-dried tomatoes with this dish. Yum!
*Bangers & Mash
Net Carbs: 12g
Weight Watchers PointsPlus: 7
Servings: 2
Ingredients
Directions

Inner foodie unleashed! I’m learning how to use herbs & spices. Last night I made my first ever infused oil with fresh rosemary and garlic.
I love cooking. But lately my inner foodie is tired of following recipes. I want to create my own dishes but need to build up my food knowledge. I’m starting with herbs and spices, the Rosetta Stone of cooking.
Once you knowing how to use herbs and spices you’ll bring out the flavor in foods and send your taste buds into orbit.
The spice aisle at my local grocery store is a mystery to me. Unlike my wine store, there are no guides to tell me what anise seed taste like or which dishes call for saffron. There are so many spices but I have no clue which ones go with fish. Which herbs go well with asparagus? Do you use different spices if you fry or grill a burger? By cracking this code, I feel I can really unleash my creativity.
I picked up Herbs & Spices: The Cook’s Reference: a wonderful book covering about 120+ herbs and spices, and loaded with great info on aroma, taste, buying, storing and instructions on how to cook with them.
I started this new adventure by infusing olive oil with fresh rosemary and garlic. I also made my own oven-dried tomatoes. Yes, these are very simple to do, but I had to start somewhere. Each baby step I take builds my confidence.

Adding olive oil to fresh rosemary and garlic. It takes about 3-4 weeks for the flavors to mix.
Rosemary-Garlic Infused Oil
Ingredients
Directions

Homemade oven-dried tomatoes add flavor to salads and sauces. I’m storing mine with olive oil and garlic.
Oven-Dried Tomatoes
Ingredients
Directions

Eating “clean” meat is an expensive proposition when going Paleo.
I wrapped up my first week on the Paleo diet, and other than the “clean” eating, it was pretty much the same as my low carb diet. In fact, I saw no difference. Granted it’s only been one week, but I have to wonder if the price of organic produce, grass-fed beef and cage-free birds, really offers that much of a health benefit.
I bring up cost only because I saw a 37% cost increase in my weekly groceries. My weekly budget for groceries is $135. For my first week on Paleo, I spent $185.67. If I don’t change anything, that’s a $200 increase by the end of this little experiment. Ouch!
Part of the sticker shock I attribute to “start-up costs” – items like ghee, coconut oil that are pricy but I won’t run out of anytime soon. But the cost of “clean” meat I find hard to swallow, experiment or no. It cost me $26.69 for 3 pounds of grass-fed ground beef. Normally I spend $16 for 7 pounds of regular ground beef (and that lasts for 3 weeks). I’m sorry, but for me to continue to spend that much on ground beef means that gold better come out the other end.
But, it’s not just beef, which is expensive (grass-fed or not), but “clean” chicken is costly too. All 3 pounds of a whole, cage-free chicken costs double the price of a 6-pound caged chicken ($11.97 vs. $5.97). Yes, I know the 6-pounder sat in a cage to get fat, that water was probably injected into the meat, and the farmer fed Foghorn hormones for good measure. But when you are a single-income family on a tight budget trying to stretch your dollars, “clean” eating means: food that doesn’t give you the trots!
Organic produce cost about $0.50-$0.70 per pound more than their non-organic counterparts. That doesn’t seem like much of a price difference, but it ended up costing me $20 more than buying non-organic produce. I know some people will think that the price is worth it to eat healthier, tastier food. But the truth is I couldn’t taste any difference, and the data is still out on whether organic is really healthier and budgets matter. In my home, $80 is a bill payment or 2 weeks of gas. It seems I’ll get more bang for my buck by using a vinegar wash to clean my non-organic fruits and vegetables.
Clearly going Paleo or eating “clean” is doable if you have other options for protein and have a larger food budget. However, if you have a limited budget, I’m just not sure it’s worth the cost.
Suggestions from you Paleoites on non-meat protein options or ideas to cut costs are welcome!
I certainly didn’t think I’d harp so much on money for my first post on trying the Paleo diet. But for me, it is a BIG deal. I promise to have more to say about the foods, recipes and my energy level throughout the challenge.
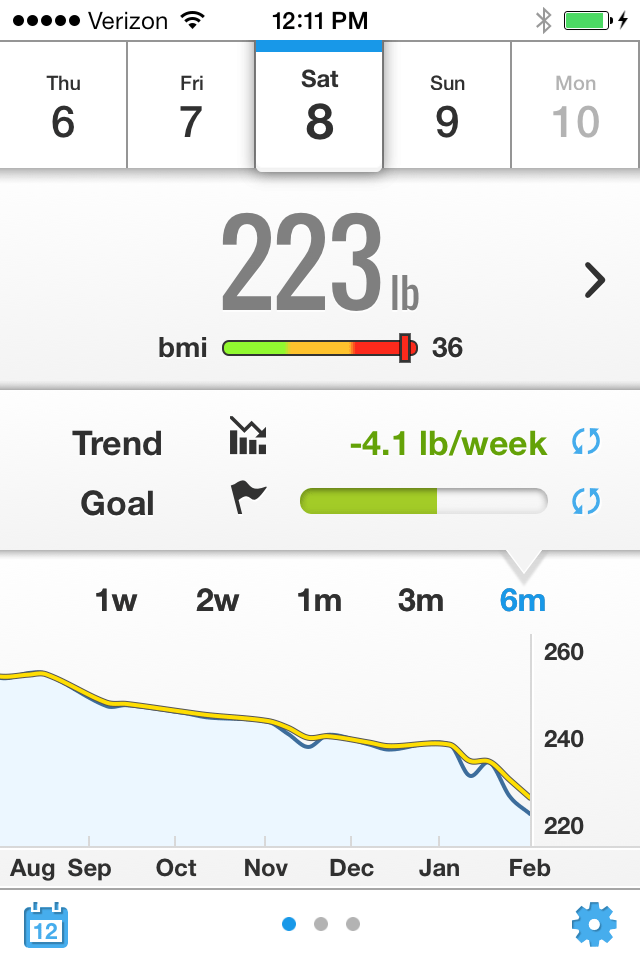
My weight stayed the same this week. Well, at least I didn’t go up!
Nothing too exciting to report from my weigh-in on Saturday. I didn’t lose or gain any weight. I’m still at 223 pounds. I did experience some mild knee pain early in the morning, but it disappeared once I started moving. I chalked it up to morning stiffness.
That changed once I hit the grocery store. The knee pain came back with abandon. Why? My 2-inch heels on my feet.
Sigh…yes my knee is healing, but not enough where I can wear anything but sneakers.
This morning I did decide to try my first spin class in two weeks – the 30-minute beginners class. I could immediately tell the two-week break from spin was good. Sprints and seated climbs were pain-free and I heard fewer popping sounds. I wish I could say the same for standing climbs. I could stand for about a minute before the knee started hurting. So I kept my butt in the saddle most of the time, standing every 5 minutes to give my tush a 30 second break from the seat.
I made it through the class and felt so good I decided to go 20 minutes longer. I loved getting in some cardio. The walks are good, but this got my heart pumping. Hopefully I can do another session on the bike this week.

My Diet Coach is like having your own weight loss cheerleader at your fingertips. The motivational tips and words of encouragement can help you stay the course.
Losing weight is near impossible without focus and motivation. Well My Diet Coach by InspiredApps is a nifty little app to keep you moving forward or get you back on track after a slip.
It doesn’t have a lot of features, and I sort of like that. It’s not overly complicated and you don’t get bogged down with too many bells and whistles. You’ll find helpful reminders, from drinking water to meal planning, to keep you on track and build good eating habits.
Speaking of reinforcing good habits, I suggest starting out with setting 1-2 reminders. Playing with the app, I set up reminders for 10 habits. That proved too many as those little chimes drove me crazy all day. I’m limiting my reminders to 2 now and all is right with the world.
The app’s challenge section helps you get through the frenzy of everyday life – dining out, parties or sweet cravings to name a few. Just press a button and you’ll find multiple messages and tips to keep you focused.
I put that feature to the test last night as I wrestled with my old nemesis, night hunger. This one is a biggie for me, especially over the last few evenings. Like clockwork, at midnight I went to open the fridge door. But this time I stopped and I pressed the “Night Hunger” challenge on the app. There I found a series of tips and messages to help talk me down. Awesome!
One of those messages (“Make sure you aren’t eating just because you are up late or bored”) was spot on. The app let me make that message a priority so when night hunger strikes again, it’s the first message I see.
For some reason the app is only for women. I’m not sure why that is as guys also have weight issues. Maybe it’s because guys look at weight loss differently then we do?
I started with the free version a few weeks ago but upgraded to Pro (only $0.99) on Saturday. The pro version includes a food craving panic button that helps talk you down. In an emergency, the app launches a countdown timer to help you get through the craving, which lasts 10-20 minutes on average.
You can also track your weight with the pro version (My Weight Watchers app tracks my weigh-ins, so I don’t use this feature).
Available for iPhone and Android, My Diet Coach is a great little app. It gives you the the little pat on the back or kick in the pants that we all need now and again.