New Jeans — From Size 28 To 14!

My old, size 28 jeans use to be too tight on me. But I refused to go up a size.

My old, size 28 jeans use to be too tight on me. But I refused to go up a size. Now, 140 lbs. later, I’ve cut my pant size in half.

Well with the recent loss of inches around my waist it was time to see if I could slide into a pair of new skinny jeans or if I’m still stuck in between sizes. As of this morning I wore a baggy size 16.

My plans were almost derailed as Old Navy was nearly depleted of size 14 jeans. After a lot of digging around, I found a pair and headed to the fitting room.

No More Fitting Room Blues…For Now
I had a flash back to the first time I entered this same store’s fitting room nearly 2 years ago during my weight loss makeover. Panic took hold of me as I thought nothing would fit.

This time around, no butterflies in the tummy. I was mildly curious…and a bit cocky. It’s not that I don’t have dressing room meltdowns on occasion. Macy’s still freaks me out. Read More


Oh You Beauty! Realizing My 2014 Everyday Beauty Goals

With 2014 coming to a close, it's time to take a look back and see how successful I was in hitting my Everyday Beauty goals.  Image courtesy of Stuart Miles and Freedigitalphoto.net.

With 2014 coming to a close, it’s time to take a look back and see how successful I was in hitting my Everyday Beauty goals. Image courtesy of Stuart Miles and Freedigitalphoto.net.

Yesterday I graded myself on my weight loss, fitness and wellness goals for 2014. This morning I turn my red pen to my 2014 Everyday Beauty Goals. As with everything in life, I can do better. Some goals I achieved while others need more work or outright effort.

2014 EVERYDAY BEAUTY GOALS

Everyday Beauty Goal 1: Wear lipstick when I leave the house
Grade: A

Success! I do this everyday…even when going to the gym. I recently diversified my colors by adding plums and some lovely reds to my pinks and brown hues. Read More


Shorter, Sassier Hair Great For Workouts

Every time I go to the salon my hair gets shorter...maybe I'll go for a pixie on the next trip.

Every time I go to the salon my hair gets shorter…maybe I’ll go for a pixie on the next trip.

Well my hair keeps getting shorter! I went in yesterday for some color and got a trim too. My husband loves it but really wants me to get a pixie cut (which he annoyingly keeps calling a “Tinkerbell“). I’m not sure I’m ready for a pixie just yet, but one thing is for sure, the shorter cut makes it easier to manage before, during and after workouts.

My bob was great, but it got a little annoying keeping the sides off my face during workouts. Also my hair was always soaking wet after a spin class or a long walk.

Enter this new, shorter cut. The back is much shorter than the sides (think reverse mullet!). My stylist also thinned out the back too, giving a much lighter feel. All I know is when I workout, it doesn’t feel like my head’s about to combust now that all the hair is gone.


OMG…I Can Wear Skinny Jeans

In March my jeans were a size 20. I'm now down to size 16 and can wear kitty approved skinny jeans.

In April my jeans were a size 20. I’m now down to size 16 and can wear kitty-approved skinny jeans.

Last night it got a little chilly, so I decided to toss on a pair of jeans before heading out to the movies with the hubby. Now I haven’t worn jeans since April. I work out so much that I haven’t worn anything other than my exercise or cycling shorts this summer.

What a shock to discover my jeans no longer fit.  They were way too baggie around the waist and thighs.  When I reached for my belt, they fell off my butt. Woohoo!

Thankfully Old Navy is having a sale on jeans today ($19/pair plus $5 off for trying on jeans). I was a size 20 so I figured I’d save time and just grab a couple of pairs of  size 18 jeans before doing my other errands.

But a little voice in my head said to try them on first. I actually thought about ignoring that little voice — I mean, no way I went from a 20 to a 16, right? Read More


Everyday Beauty Alert: I’m Growing Talons!

Can you tell I have acrylics? How sad.

Can you tell I have acrylics? How sad.

Just before Christmas, I opted for acrylic nails and not my regular manicure. I’m very hard on my nails and it’s a challenge to grow them. I figured I’ll protect and grow my nails under the fake nails.

With acrylics you really need to get a fill every other week, or you’ll see a gap between the fake nail and your own nails.

Today I realize I’m more than three weeks overdue for getting a fill. Yikes! I don’t have a gap to fill, I have a crevasse.  Nearly 1/8 of an inch!

That’s just sad…and lazy!

While I’m amazed at how fast these suckers are growing, I’m more amazed that none of the acrylic nails have popped off.

Well, I’m off to the salon for a little nail TLC…and to think about amending my 2014 goals to include a little everyday beauty.


Choosing A Red Lipstick — Not As Easy As You Think

Feeling a little sassy playing with my new red lipstick.

It’s late and I’m feeling tired, yet sassy as I play with my new red lipstick.

Can someone tell me why picking out a red lipstick is so frickin’ hard? I spent what seemed like an eternity at Sephora analyzing every single red lipstick in the store.

Before walking into the store, I did my homework. I’ve read tons of articles about orange-reds, blue-reds and true reds. And all the writers can’t seem to agree on a magic formula.

After spending nearly an hour checking out all of reds, I decided to throw myself at the mercy of the Sephora chicks to pick a color for me.

So began my odyssey of trying on one color after another. Focusing on the Sephora Collection, first up was Deep Brick Red, my first experience with a “blue-red” color. I absolutely loved the color, but it was so intense. Very much a Snow White look. But up against my pale skin, my lips were all that you saw.

Sigh…

Next my Sephora chick picked out a beautiful pink that I promptly shot down. I was there to conquer my fear of red lips. No pink today!

We then looked at two lovely colors that looked pretty – Classic Bright Red and Valentine. But yet again I felt washed out. The bright red was, well BRIGHT! But I absolutely loved the color, just not the pasty white skin on my face.

The Valentine? It didn’t just pop against my skin color, it supernovaed on me.

I ended up leaving the store empty-handed and dejected.

I decided to start from the beginning, refining my search for some solid advice.

Enter Makeup Geek.

Finally someone who knows how hard it is picking the right red.

Makeup Geek’s post on red lipstick struck a chord with me. She suggest it’s more about how bright the color is against your skin and not the lipstick color. But you also need to consider your eye and hair color as well as your eye makeup too.

When I walked into Sephora, I wasn’t wearing makeup. So any red lipstick would make me pasty white.

So I put on my makeup, choosing Laura Mercier’s Crystal Beige and Morning Dew eye shadow and headed back to Sephora.

Wow what a difference. Both the Classic Bright Red and Deep Brick Red looked amazing. The Valentine…no so much. The colors popped but didn’t overwhelm my face. But I only had enough cash for one. I chose the Classic Bright Red. I always go with darker colors, so I decided to pull a George Costanza and go the opposite of my instinct!

Makeup Geek recommends 5 possible reds that most people can pull off. I plan to check those out soon.

But I know in a couple of weeks, I’m going back for the Brick Red.


Don’t Fear The Powder Eyeliner

My first attempt at powder eyeliner. It was fairly easy applying it to my upper eyelid. My lower lid is another story.

My first attempt at powder eyeliner. It was fairly easy applying it to my upper eyelid. My lower lid is another story.

After finally getting the hang of pencil eyeliner last week, I decided it was time to give powder a try. Armed with the Laura Mercier Color Wardrobe, an angled brush I picked up at Sephora, and a few of Q-Tips, I was ready to do battle.

Actually, it was more tussle than battle.

On my first attempt, I pretty much nailed my upper eyelids perfectly.  I simply wet my brush, dipped it in the powder and pressed the brush into my eyelashes. Pretty simple and sadly, anti-climactic.

After last week’s challenge with using the pencil liner, I was expecting more of a challenge.

Why was I so afraid? This was easy.

I only messed up the outside corner of my upper eyelid. There is a reason you use an  angled brush! But I was able to fix it right up with a trusty Q-tip.

Then it was time to do the lower lid.

It looks OK in the photo above, but in person it was a hot mess.

First I applied way too much pressure. The brush’s bristles felt like pins. My eye started tearing, causing the powder I applied to run.

Drunken raccoon, here I come.

Did a few tears and eye pain stop me?  Nope. I continued across my eye. But my hand became more jumpy out of fear of pressing too hard again. The result was a very jagged line under my eye.  No amount of smudging could salvage what I did.

Feeling a bid defeated, I sucked it up, wiped away the eyeliner and went back for round two. Starting with my lower lid, I relaxed my hand and gently pressed on my eyelash line.

No pain.

My second try at applying powdered eyeliner. Once I relaxed my hand and stopped pressing the blasted brush into my eye, things got much easier!

My second try at applying powdered eyeliner. Once I relaxed my hand and stopped pressing the blasted brush into my eye, things got much easier!

I followed my lash line, applying the powder to only the outer 1/3 of the lashes.  Gone were the jagged lines and the drunken raccoon. Just a few strokes with the Q-tip and I was staring at one smooth line. Sweet!

Do I still think eyeliner is the devil?  No.

I’m a little excited about playing with different colors and trying more dramatic looks down the road. For now, I’m just happy I didn’t poke my eye out.


Eyeliner Is The Devil!

eyeliner

The carnage! Why is eyeliner so damn hard to put on?

Like foosball, eyeliner is the devil! I’m convinced of it. It seems like no matter what I do I ended up looking like a drunk raccoon.

Despite my make-up makeover, eyeliner stumps me.

Applying it to my lower eyelid is easy. It’s that damn upper lid. Following my eye line is impossible. I always end up with a very uneven line and no amount of smudging will help.

Well this week it’s practice, practice, practice!

I worked on my eyes for an hour yesterday, trying to master my eyeliner pencils.  Tomorrow I’m working on applying the powders.

What happens when my hands are not steady. One side is much lighter than the other.

What happens when my hands are not steady. One side is much lighter than the other.

Technique challenges
After the first 20 minutes, I realized two problems.

First, I’m trying to apply it while standing.  Hummmm…I think I need to sit down and place my elbow on the countertop. That should help steady the hand doing the deed.

My second problem, is more mental. I’m very squeamish when it comes to anything near my eyes. Heck, I can’t even wear contacts because it gives me the willies. As soon as I get the pencil close to my eye, I start the rapid blinking. I realized I had a problem when I flinched…that left a lovely line that no Q-tip could fix.

Always have the right tools!
Sitting at my desk with a new strategy in hand, I began working on my upper eyelid. Right away I notice that some eyeliner pencils go on easier than others, making a steady hand even more important.

Also, I need to invest in a sharpener. You really lose control with a dull pencil.

I started to get the hang of eyeliner about 30 minutes into my practice session.

I started to get the hang of eyeliner about an hour into my practice session.

The results?
I tried my black, blue and brown pencils. I got the best results with the brown followed closely by the blue. No matter what I did, it seemed as if the black always went on in globs. That tells me it might be the pencil and not me.

I focused on short strokes along my eyelash line while holding down my eyelid. Starting on the outside of my eye, I worked my way in towards my nose. I’m not sure if I should go all the way over or stop at mid-point.  Also, is it best for the eyeliner to go on first or last? Since I’m holding my eyelid down, shouldn’t eyeliner go on first to avoid smudging the eyeshadow?

So many questions…I’m going to need to put out an SOS to my Glam Squad.

A couple of times I went too fast and started drawing long lines with awful results.

After an hour I felt I got the hang of it. Most mistakes were tiny and something I could easily correct with a Q-tip.

Tomorrow I need to drop by Sephora for a sharpener, a good black eyeliner pencil (maybe green too!) and a slanted brush to practice with the powder.

I will master this witchcraft.

Related Articles
You can follow my weight loss make-over here:


Everyday Beauty – Gray Hair And Mastering That Damn Curling Iron!

everyday beauty, weight loss hair makeover, curling iron

For weeks I’ve been curling iron challenged. Thanks to Jenny, my hair stylist, I’m closer to mastering the perfect curl.

It’s been six weeks since my weight loss hair makeover and right on cue my gray hairs started sprouting. Now I’m notorious for letting the gray take over before breaking down and buying a box of color. Not anymore.

It was time to head back to the salon to visit my new favorite stylist Jenny.

Besides touching up my roots, I wanted Jenny to do another tutorial on the curling iron for me. I’ve tried to use it, but I always end up with a clamp dent near the ends. I got so frustrated that I started using my hot rollers again.

Burning Washing That Gray Out
My highlights and my ends still look awesome so no need for foil or a haircut this time out. Just a root touch up today.

Normally when I dye my hair I don’t wash it the day before. I want some oil build up to protect my scalp from the inevitable burning sensation. Well after yesterday’s workout and run, my hair was too funky not to wash.

So I braced myself. But as Jenny applied the dye, nothing happened. In fact, if felt quite cool.

I don’t know what hair dye product the salon uses, but it’s awesome! My scalp didn’t feel like it was on fire.

That’s it! No more box dye for me!

Prepping My Hair
After my shampoo, it was time to start styling. Jenny applied a heat protectant followed by a stronghold mousse to my wet hair. One to protect my hair from the heat of the iron and the other to define the curls and fight frizz.

And of course, I don’t have either in my home. Guess I’m going shopping this weekend.

Curling Iron Tutorial
dot curlWith my hair dried, Jenny handed me the curling iron and asked me to show her my mad skills!

I picked up a 2 inch section of hair, ran it through the curling iron first. I then clamped it about an inch from the end and rolled up until my hair was completely around the barrel. I released the clamp after about 10 seconds and…a near perfect curl.

Crap. It’s like taking your car in for repairs and you can’t reproduce the problem for the mechanic.

Hmmmm…me thinks the hair prep is a reason for great curls.

However, Jenny did notice a few problems with my technique.

I tend to hold the curling iron at an angle. Instead I need to keep it vertical (parallel to my face) with the clamp facing forward. Also I turned the iron in towards my face. Oops! I need to curl away from my face.

Jenny also recommends spraying my hair with a light-hold hairspray before using the iron. It’ll help hold the curls while doing my hair (I have a lot of hair!).

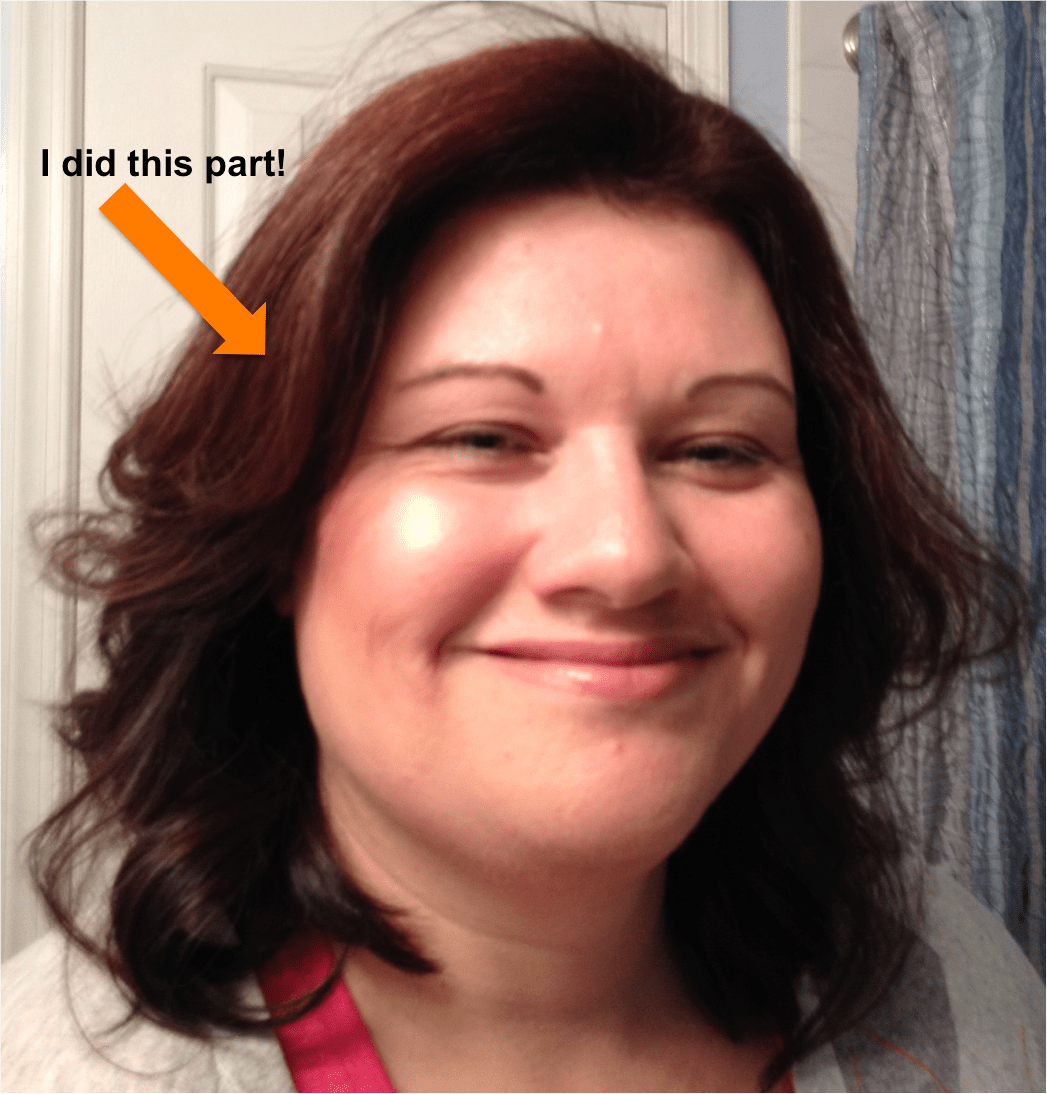
I carefully watched as she curled rest of my hair. When she got to the last piece to curl, she handed the iron over for me to do the honors.

I did everything right, including curling away from my face.

Whew!

Time to send those hot rollers packing.


Head-2-Toe Makeover Next Month

Kitty likes my new dress size. And really, who wouldn't? I just need some more lbs to come off below the waist, then it's new wardrobe time!

Kitty likes my new dress size. And really, who wouldn’t? I just need some more pounds to come off below the waist, then it’s new wardrobe time!

Today is an awesome day!

Thanks to a business meeting, I needed a new outfit. Lo and behold my new dress (and belt).

Oh, did I mention it’s a size 20 (woohoo!) and, more importantly, kitty approved!

I’m not quite there yet as far as pants, but most size 20 dresses and tops fit pretty dang good this weekend.

The timing is perfect. Next month I’m going in for a full makeover: hair, make-up, clothes and shoes. I’m enlisting the help of some good friends who do this professionally.  I’m overly conservative in my selections and I need a fresh perspective. The weight loss gives me the confidence to try new styles and looks.

More details when we get closer to the event, plus you’ll have ring side seats.